Welcome to part two of Building a Frame Web Application! In the previous blog post we focused on making sure we had the proper development environment set up. We also made our first API call, which successfully connected to the Frame backplane to provide us with information about a resource we controlled. It’s now time to develop a deeper understanding of how we’re making these API calls, and putting them together to do something that’s actually useful.
What’s in a response?
You’re going to use a Python feature called the REPL (Read-Evaluate-Print-Loop) to explore API calls. The REPL is a program that helps you explore Python commands and data structures interactively. Fire up your terminal once again, and head into your project directory from last time. Don’t forget to activate your virtual environment.
On MacOS and Linux:
source env/bin/activate
And on Windows:
.\env\Scripts\activate
If you just typed python, you would be inside the Python REPL. However, this default REPL is lacking in many convenience features. To alleviate this, we’re going to use a REPL called ipython. The “i” is short for interactive. Some of the features in this new REPL include easier command history management, syntax highlighting, and a user-friendly way of displaying data structures. You can install it by:
pip install ipython
Once that’s done, enter the REPL by just entering:
ipython
You should now be inside the REPL. You can type Python commands here, and get results back immediately. Any valid Python code can run in this environment, which means we can play around with the previous API calls we made in part one of this series. And just like last time, we’ll need to authenticate before we make any API call. To do so, just copy and paste the authentication code block from last time into the REPL:
import hashlib
import hmac
import time
import requests
import base64

CLIENT_ID = "<Your API Client ID goes here>"
CLIENT_SECRET = b"<Your API Client Secret goes here>"

def authenticate():
    # Create signature

    timestamp = int(time.time())
    to_sign = "%s%s" % (timestamp, CLIENT_ID)
    signature = hmac.new(CLIENT_SECRET, to_sign.encode('utf-8'), hashlib.sha256).hexdigest()

    # Prepare http request headers

    headers = { "X-Frame-ClientId": CLIENT_ID, "X-Frame-Timestamp": str(timestamp), "X-Frame-Signature": signature }

    return headers
Now, let’s try to get a list of our accounts using the same API call from last time. Here, the small variable r is just short for “request.”
r = requests.get("https://api-gateway-prod.frame.nutanix.com/v1/accounts", headers=authenticate())
If nothing happens on the screen, you’re golden. Try typing just r into the REPL, and hitting enter. If you’re seeing “Response [200]”, that means the request was successfully processed. In general, any response starting with 2 is a good thing. To learn more about the different kinds of HTTP responses you can get, check out the link here.
Let’s start dissecting the response a bit. Enter:
r.content
And you should see something similar to this:
b'[{"id":"5c93f76b-af61-4466-8b22-ef20e8bcbe44","name":"Mi\xc4\x87ko\'s Test
Account","website":null,"description":null,"active":true,"last_publish":"2020
-12-16T09:20:35"},{"id":"60c96d26-8852-4c54-ab69-ecd3d0323a07","name":"Micko
UK Delete 200727T114131","website":null,"description":null,"active":false,"last_publish":null}]'
This is the response that the server provided us with when we called the /v1/accounts endpoint. It’s great that there is a response, but it’s easier to visualize what was returned to us using JSON. Convert this response to json, by calling the corresponding json method:
r.json()
You should see something like this:
[{'id': '5c93f76b-af61-4466-8b22-ef20e8bcbe44',
  'name': "Mićko's Test Account",
  'website': None,
  'description': None,
  'active': True,
  'last_publish': '2020-12-16T09:20:35'},
 {'id': '60c96d26-8852-4c54-ab69-ecd3d0323a07',
  'name': 'Micko UK Delete 200727T114131',
  'website': None,
  'description': None,
  'active': False,
  'last_publish': None}]
This is much easier to parse for humans. I have two accounts because inside of this organization I previously created two accounts. One of them has also been deleted, and this is denoted when the active parameter is set to false. You may have one or more accounts show up here, along with any accounts that you’ve retired.
With this information, you’re able to play around with the parameters as you please. For example, to get all the IDs:
for account in r.json():
    print(account['id'])
IDs are particularly useful when working with an API. Like any other computer system, it’s how we reference resources when we want to do things with them. If you take a look at the Frame Admin API documentation, there are many API calls that require an account ID. For example, let’s get a list of all recent sessions for an account.
First, let’s store the account ID in an account variable to make it easier to reference:
account = r.json()[0]['id']
I have two accounts, and selected the one that was active for me, which is the first account in the response. Because we start counting at 0, this is the 0th account. If you have more than one account, be sure to select an active one! For example, if the 3rd account on the list is the active one, you would want to execute:
account = r.json()[2]['id']
Before we make the API call, let’s take a look at the documentation for listing recent sessions. When we do this, we see that the API call takes the form of /accounts/${id}/recent_sessions. This means we need to stick the account ID in the middle there. Let’s make the call:
r = requests.get("https://api-gateway-
prod.frame.nutanix.com/v1/accounts/{}/recent_s
essions".format(account), headers=authenticate())
Just as before, let’s make sure we’re getting a 200. Note that the {} above is for string substitution. Think of the {} as a placeholder that will be filled with the value of account in format(account).
We can be more explicit by taking a look at the status code itself:
r.status_code
If you’re getting a 200 back, then everything has completed successfully. Okay. now let’s take a look at what the Frame backplane had to say:
r.json()
You should be getting back a list of session objects that look something like this.
[{'end_time': '2021-02-05T14:18:46.746777Z',
  'fail_description': None,
  'hash_id': 'W0JkxPq7OBpzd4oE',
  'id': 'gateway-prod.W0JkxPq7OBpzd4oE',
  'location': {'city': 'Belgrade',
   'client_ip': '94.189.232.192',
   'county': None,
   'distance': 660.0468066035355},
  'pool_id': 'gateway-prod.435701',
  'server': {'address': 'prod-18-185-69-252.nutanixframe.com',
   'https': True,
   'id': 'gateway-prod.5097939',
   'instance_type': 't2.medium',
   'pool_group_type': 'production',
   'wsport': '443'},
  'session_duration': 181,
  'start_time': '2021-02-05T14:15:45.113805Z',
  'state': 'closed',
  'timeouts': {'connection': 120, 'idle': 600, 'max_duration': 3600},
  'user_uuid': '89be2b11-f20a-4d56-8cf1-8dfd42093d06'}]
I only have one recent session, so I’m only seeing one session object. If you’re not seeing anything, that means that there haven’t been any recent sessions! Go to your account’s launchpad, and start a quick session, close it, and then try making the API call again. It should show up in the list with r.json().
In this object, we can see all sorts of useful attributes pertaining to a session. What about if I wanted to list all the servers for an account? Can you figure out how to start your account’s sandbox like this? It’s as simple as:
# List servers
servers = requests.get("https://api-gateway-prod.frame.nutanix.com/v1/accounts/{}/servers".format(account), headers=authenticate())
servers.json()

# Start sandbox
requests.post("https://api-gateway-prod.frame.nutanix.com/v1/accounts/{}/sandbox/start".format(account), headers=authenticate())
r.status_code
Note that the second API call uses POST via requests.post instead of GET. The distinction between the two is that GET calls retrieve information, whereas POST calls alter information, or create new information.
Can you figure out how to stop a sandbox? What about rebooting it? These questions are left as an exercise to the reader.
Putting it all together
So we’ve made a bunch of different API calls. Let’s go back to our main application, and remind ourselves of how to run it. Make sure that the environment variable is set:
export FLASK_APP=main.py
On Windows with just the command prompt:
set FLASK_APP=main.py
And on Windows with PowerShell:
$env:FLASK_APP = "main.py"
Once this is done, run Flask:
flask run
Flask will output a URL local to your machine to see what the web page looks like. By default, this is http://127.0.0.1:5000. When we visit this, we see that it’s pretty barebones. Let’s work on fleshing it out.
You don’t need to be an expert in HTML, or CSS, even though we’ll be using these technologies to build our web application. To start off with, change your main function to read:
@app.route('/')
def main():
    # Grab all the accounts
    accounts = requests.get("https://api-gateway-prod.frame.nutanix.com/v1/accounts", headers=authenticate())

    # Get the sandbox status for each account

    sandbox_statuses = {}

    for account in accounts.json():
        if not account["active"]:
            continue

        r = requests.get("https://api-gateway-prod.frame.nutanix.com/v1/accounts/{}/sandbox/status".format(account["id"]), headers=authenticate())
        sandbox_statuses[account["id"]] = r.json()["status"]

    return render_template("base.html", accounts=accounts.json(), sandboxes=sandbox_statuses)
The very first line, @app.route(‘/’), tells Flask that this function will be used to render the root of the site, which is always denoted by a lone slash. Inside of the function, we make an API call to get all the accounts in your Frame environment. We then make additional API calls for each account to grab the status of each account’s sandbox, and then store that information in a variable called sandbox_statuses. After that, we pass the list of accounts and sandbox statuses to a render function that uses an HTML template to display the results.
We’ll be covering that part right now, but before we go on, it’s important to draw your attention to a few things. The first is that these API calls are currently a blocking process in rendering the web application. This means that the web page won’t display until these API calls have finished. And given the kinds of API calls we’re making, this could take a few seconds sometimes. In a production environment, it’s a best practice to render your page as fast as possible. The second thing to be aware of is the need to rate limit and stagger your API calls. With a few accounts, this isn’t so problematic, but just imagine a scenario where you have, say, a hundred accounts. Hammering the Frame backplane with a hundred requests every time you refresh the page is a bad idea.
Finally, it’s important to be aware that all of this is just an example, and as such is fairly limited. To get updates to whatever is on the page, you’ll need to refresh.
With all of that said, we have just created rendering logic. It’s now time to create the HTML template that will render the data we’re passing into it.
- Start by creating a templates folder called “templates” in the root of your project folder. This is the folder that contains main.py, and an env folder to go with it.
- Create a blank file called “base.html” in this templates folder.
I’m assuming your familiarity with HTML and CSS is fairly basic, so I’ve taken the liberty of creating something for you. It’s not a work of art, but it gets the point across. Once we’ve completed the steps above, copy and paste the following HTML into your base.html template.
<!doctype html>
<html lang="en">
  <head>
    <meta charset="utf-8">
    <meta name="viewport" content="width=device-width, initial-scale=1">

    <link rel="stylesheet" href="https://cdn.jsdelivr.net/npm/picnic">

    <style>
       body { margin: 2em; }}
    </style>

    <title>Frame Account Manager</title>
  </head>
  <body>

  <div class="flex two">
    <div>
      <h2>Clone</h1>
      <span>Select a master template account to clone from:</span>
      <form action="/clone" method="post">
	<select name="account">
	  {% for account in accounts if account['active'] %}
          <option value="{{ account['id'] }}">{{ account['name'] }}</option>
	  {% endfor %}
	</select>
        <button type="submit" formmethod="post">Clone</button>
      </form>
    </div>
    <div>
      <h2>Publish all</h2>
      Click the button below to publish all accounts.<br/>
      <a href="/publish"><button class='success'>Publish</button></a>
    </div>
  </div>

  <div class="flex one center">
    <!-- Accounts -->
    <table class="primary">
      <thead>
	<tr>
          <th>Account</th>
          <th>Description</th>
          <th>Last published</th>
          <th>Sandbox status</th>
	</tr>
      </thead>
      <tbody>
	{% for account in accounts if account['active'] %}
	<tr>
          <td>{{ account['name']}}</td>
          <td>{{ account['description'] }}</td>
          <td>{{ account['last_publish'] }}</td>
          <td>{{ sandboxes[account['id']] }}</td>
	</tr>
	{% endfor %}
      </tbody>
    </table>
  </div>
  </body>
</html>
To make things easier, we’re using a minimal CSS framework called Picnic, and loading it into the page. After that, we’re creating two buttons: one to clone, and one to publish accounts. This is exactly what our fictional boss requested of us. It also doesn’t get simpler than a single click to complete these functions. And, finally, below we’re listing all the accounts, along with their sandbox statuses that we retrieved from Python. Once you’ve completed this step, go into the terminal window running flask, and hit ctrl+c to quit the process, and rerun flask using:
flask run
You should see something like this:
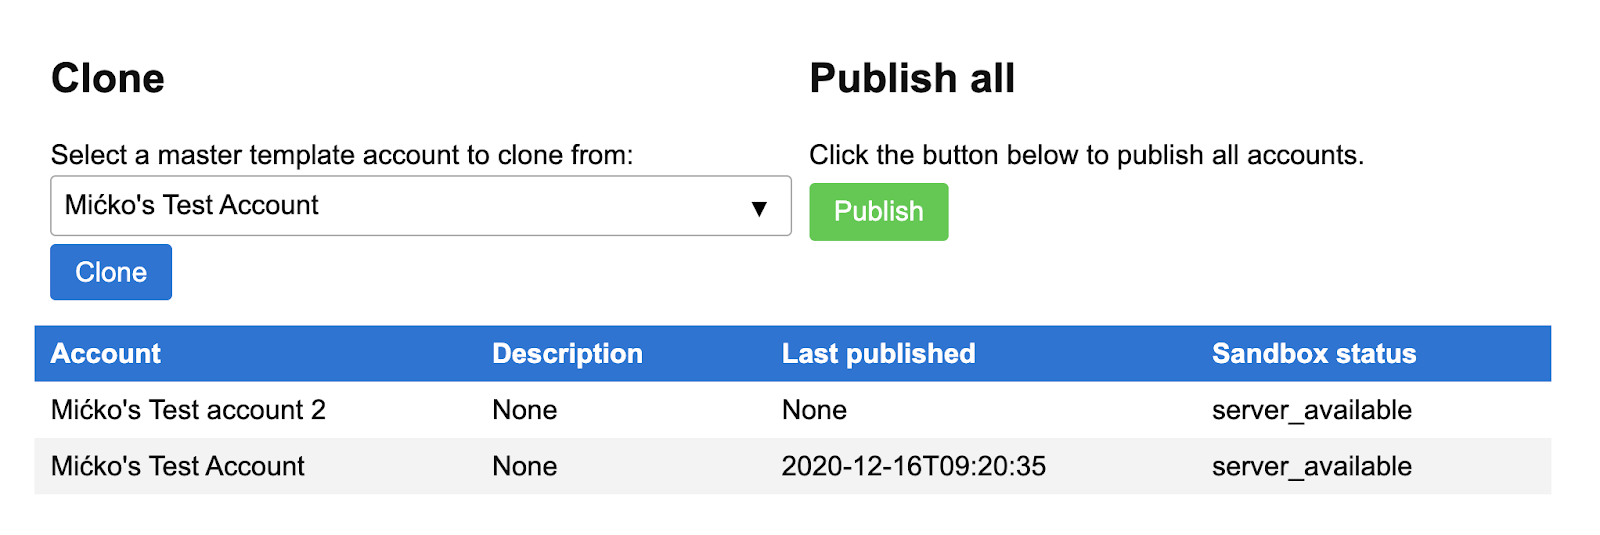
It’s not the prettiest design, but it works for our purposes! Our accounts should be listed in the table. Note that we filtered any retired accounts from appearing within the rendering function. You’ll also notice that the cloning and publishing functions on this page currently do nothing. We’ll go over that now.
But before we do, be sure to have at least two accounts. Create one more if you need to right now.
After you’ve created your second account, let’s think about the steps necessary to clone an account’s sandbox to other account sandboxes. We need to:
- Figure out what the template sandbox is.
- Grab a list of all remaining sandboxes.
- Clone the template sandbox to all other accounts.
We can cover #1 using the select element on the webpage. Coincidentally, this also covers step #2 because it’s possible to use this account filter against all other accounts. And finally, step #3 can be covered with an API call to actually start the cloning process. Now that we have all this down, what does this look like in Python?
Well, first we want to create a new URL handler. Let’s start defining our function like so:
@app.route('/clone', methods = ['POST'])
def clone():
    return request.form['account']
The first line tells us that our website URL will handle this request on /clone and use a POST method to send data. For now, with the third line of code, we’re just returning whatever the account ID is back to the browser. Go ahead and save this, and restart Flask. Select an account, and click the blue clone button.
You should see the selected account’s ID displayed on the web page.
Let’s create the rest of the functionality, by filtering for the remaining accounts, and calling the clone API directly! The final method should look like this:
@app.route('/clone', methods = ['POST'])
def clone():
    # Grab all the accounts that are not retired, and not the selected account.
    accounts = requests.get("https://api-gateway-prod.frame.nutanix.com/v1/accounts", headers=authenticate())
    account_ids = []

    for account in accounts.json():
        if not account["active"] or request.form['account'] == account['id']:
            continue

        account_ids.append(account['id'])

    # Clone the user-selected sandbox to all accounts

    account_pools = requests.get("https://api-gateway-prod.frame.nutanix.com/v1/accounts/{}/pools".format(request.form['account']), headers=authenticate())
    source_pool = ""

    for pool in account_pools.json():
        if pool['kind'] == 'sandbox':
            source_pool = pool['id']

    for account_id in account_ids:
        payload = {'account_id': account_id}
        r = requests.post("https://api-gateway-prod.frame.nutanix.com/v1/accounts/{}/pools/{}/clone".format(request.form['account'], source_pool), json=payload, headers=authenticate())

    return redirect(url_for('main'))
Let’s go through this, section by section.
We’re entering into this function with a user selection that’s accessed via request.form. The specific variable we’re interested in is stored in “account”, so the way we reference this is by looking it up with request.form['account']. This is the ID we’ll be cloning from.
The next few lines are getting a list of accounts, while ignoring the account we’re cloning from, and any accounts that have been retired. We store these account IDs in a list.
Before we make the API clone call, we need to find out the source pool ID of the sandbox we’re cloning from, and that’s an extra API call. We filter through the pools returned to find the one corresponding to the sandbox, and store that for the next API call. Once we finish with that, we finally make the one API call per account to clone to the sandbox image over.
When the cloning process has finished completely, the accounts that have been cloned will have a sandbox status of “running_server_available”. Feel free to keep refreshing the page, or look at your Frame accounts directly to track the status of each sandbox. If you want to explore further, the Frame Admin APi even provides an endpoint for tasks. As each clone process is essentially a task, you’re able to query about the status of the clone operation that way too. This is, however, left as an exercise to the reader.
Note that at the very end of our cloning function, we redirect back to the main page. Ideally, this is where an application would provide relevant feedback to the user. Right now, they’re stuck refreshing the page.
Study the code above, and make sure that you’re comfortable with it. Python is often called pseudo code for a reason, and you should be able to understand most of what’s going on.
With that done, let’s finish off the second half of that page, which is all about publishing accounts. Like last time, let’s think about what we need to do to make that happen:
- Gather a list of all active accounts.
- Publish each account.
Rather straightforward, isn’t it? Let’s see these steps in action:
@app.route('/publish')
def publish():
    # Grab all the accounts that are not retired, and not the selected account.
    accounts = requests.get("https://api-gateway-prod.frame.nutanix.com/v1/accounts", headers=authenticate())

    account_ids = []

    for account in accounts.json():
        if not account["active"]:
            continue

        account_ids.append(account['id'])

    # Publish each account

    for account_id in account_ids:
        requests.post("https://api-gateway-prod.frame.nutanix.com/v1/accounts/{}/publish".format(account_id), headers=authenticate())

    return redirect(url_for('main'))
Like the cloning process, once the publish is done, the sandbox will be turned on, and will display “running_server_available” for the remainder of the hour from the time the publishing process started. It’s also possible to track this via tasks, but that’s a whole other series of API calls to make.
Also, like before, study the code above. It’s simpler than cloning accounts. Can you see where we get the list of accounts? What about publishing each of those accounts?
Your web application
For posterity, your Python file main.py should look like this:
from flask import Flask, request, render_template, url_for, redirect
import hashlib
import hmac
import time
import requests
import base64

CLIENT_ID = "CLIENT_ID_HERE"
CLIENT_SECRET = b"CLIENT_SECRET_HET"

app = Flask(__name__)

def authenticate():
    # Create signature
    timestamp = int(time.time())
    to_sign = "%s%s" % (timestamp, CLIENT_ID)
    signature = hmac.new(CLIENT_SECRET, to_sign.encode('utf-8'), hashlib.sha256).hexdigest()

    # Prepare http request headers
    headers = { "X-Frame-ClientId": CLIENT_ID, "X-Frame-Timestamp": str(timestamp), "X-Frame-Signature": signature }

    return headers


@app.route('/')
def main():
    # Grab all the accounts
    accounts = requests.get("https://api-gateway-prod.frame.nutanix.com/v1/accounts", headers=authenticate())

    # Get the sandbox status for each account
    sandbox_statuses = {}

    for account in accounts.json():
        if not account["active"]:
            continue

        r = requests.get("https://api-gateway-prod.frame.nutanix.com/v1/accounts/{}/sandbox/status".format(account["id"]), headers=authenticate())
        sandbox_statuses[account["id"]] = r.json()["status"]

    return render_template("base.html", accounts=accounts.json(), sandboxes=sandbox_statuses)


@app.route('/clone', methods = ['POST'])
def clone():
    # Grab all the accounts that are not retired, and not the selected account.
    accounts = requests.get("https://api-gateway-prod.frame.nutanix.com/v1/accounts", headers=authenticate())
    account_ids = []

    for account in accounts.json():
        if not account["active"] or request.form['account'] == account['id']:
            continue

        account_ids.append(account['id'])

    # Clone the user-selected sandbox to all accounts

    account_pools = requests.get("https://api-gateway-prod.frame.nutanix.com/v1/accounts/{}/pools".format(request.form['account']), headers=authenticate())
    source_pool = ""

    for pool in account_pools.json():
        if pool['kind'] == 'sandbox':
            source_pool = pool['id']

    for account_id in account_ids:
        payload = {'account_id': account_id}
        r = requests.post("https://api-gateway-prod.frame.nutanix.com/v1/accounts/{}/pools/{}/clone".format(request.form['account'], source_pool), json=payload, headers=authenticate())

    return redirect(url_for('main'))


@app.route('/publish')
def publish():
    # Grab all the accounts that are not retired, and not the selected account.
    accounts = requests.get("https://api-gateway-prod.frame.nutanix.com/v1/accounts", headers=authenticate())

    account_ids = []

    for account in accounts.json():
        if not account["active"]:
            continue

        account_ids.append(account['id'])

    # Publish each account
    for account_id in account_ids:
        requests.post("https://api-gateway-prod.frame.nutanix.com/v1/accounts/{}/publish".format(account_id), headers=authenticate())

    return redirect(url_for('main'))
Wrapping up
Just like that, using the Frame Admin API, we’ve implemented two features that don’t exist on the Frame platform:
- Cloning to multiple accounts with one click.
- Publishing all accounts with one click.
Using the Frame Admin API, it’s possible to build a customized workflow to fit your business needs. Here, we’ve developed something that fits a user-acceptance-testing (UAT) model, where a theoretical QA team gives a green light before pushing out final changes. It’s an example that’s easy to adapt to your own business needs.
It’s also important to note that the code above is for illustrative purposes only! There are many things wrong with it, so don’t go deploying it to production! The code often repeats itself and could really use some helper functions; it’s not secure; it doesn’t handle errors; and it’s not very user friendly. There are many ways to improve it, and for the diligent students among you, here are some ideas:
- Track cloning, and publishing tasks, and display them on the page.
- Color code the sandbox status, and maybe display a more user-friendly name so it’s easier to see at a glance.
- Instead of redirecting, provide feedback to the page that accounts have been cloned or published.
- Eliminate the need to refresh the screen to get updates using Javascript.
- If you’re more programmatically inclined, we’re currently repeating ourselves quite a bit in Python. Can you compartmentalize some of the code so we aren’t repeating ourselves so often?
I hope this has been useful for you. Feel free to give Frame a test drive, and let us know if you have any questions, or need help with the API!
This blog is provided for informational purposes only. For more detailed technical specifications and knowledge base articles about the Nutanix technology please create a my.nutanix account which will provide you with a wealth of documentation to support your Nutanix discovery.
© 2021 Nutanix, Inc. All rights reserved. Nutanix, the Nutanix logo and all Nutanix product and service names mentioned herein are registered trademarks or trademarks of Nutanix, Inc. in the United States and other countries. Other brand names mentioned herein are for identification purposes only and may be the trademarks of their respective holder(s). This post may contain links to external websites that are not part of Nutanix.com. Nutanix does not control these sites and disclaims all responsibility for the content or accuracy of any external site. This post may contain express and implied forward-looking statements, which are not historical facts and are instead based on our current expectations, estimates and beliefs. The accuracy of such statements involves risks and uncertainties and depends upon future events, including those that may be beyond our control, and actual results may differ materially and adversely from those anticipated or implied by such statements. Any forward-looking statements included herein speak only as of the date hereof and, except as required by law, we assume no obligation to update or otherwise revise any of such forward-looking statements to reflect subsequent events or circumstances.