As enterprises continue to expand their IT footprint into the public clouds, extending existing private networking infrastructure into the public cloud has become more critical. To address the flexibility that this requires, Nutanix has added a Bring Your Own (BYO) Networking feature to its Frame™ Desktop-as-a-Service (DaaS) solution. In a previous blog, I walked through how to use this feature in the AWS® platform. In this blog, I will walk you through how an environment could be set up in an Azure® cloud infrastructure. Integration between your Frame-managed workloads with an actual private network depends on the specific implementation of your private network.
You can find details on the network requirements for using Frame in a BYO networking scenario at Public Cloud with Private Networking.
Requirements for BYO Networking
Frame DaaS requires the following information to deploy BYO Networking to your Azure implementation:
- A Frame customer or organization with an attached Azure Subscription (instructions for attaching your Azure Subscription to your Frame customer or organization entity can be found here).
- The Virtual Network ID of the Azure VNet you are deploying to.
- The Subnet ID for the subnet in the VNet where the workloads will be deployed (These subnets will need outbound internet access).
Figure 1 below illustrates the network architecture of what I created for this blog.
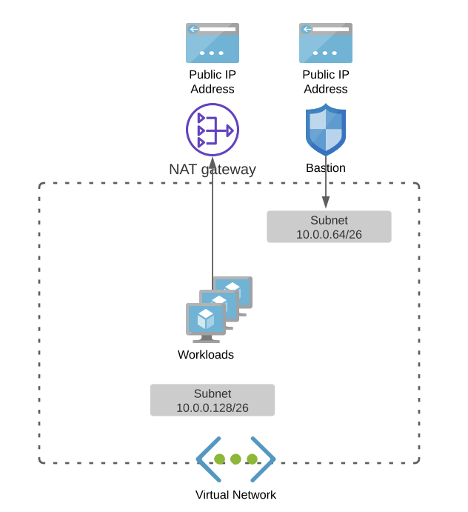
Figure 1. BYO Networking Virtual Network
Create a Resource Group and a Virtual Network
An Azure Resource Group is a convenient way to group resources that work together in Azure. In my case, I created one in the South Central US as seen in Figure 2.
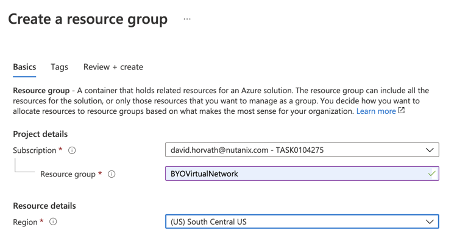
Figure 2. Create a resource group
Then you can create a virtual network in that resource group. During that process, you can also create the subnet you will need for the Frame workloads. In Figure 2 above I have one subnet that is a /26 so I created a VNet with a /24 and put that /26 subnet in the VNet.
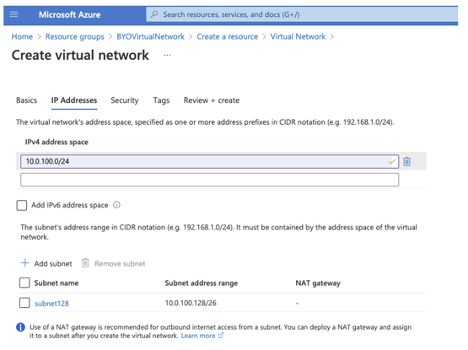
Figure 3. Create a subnet in a Virtual Network
For testing purposes, it is often handy to have a Bastion Host so that you can access the private network. Go to the “Security” tab to enable the Bastion Host and fill out the form.
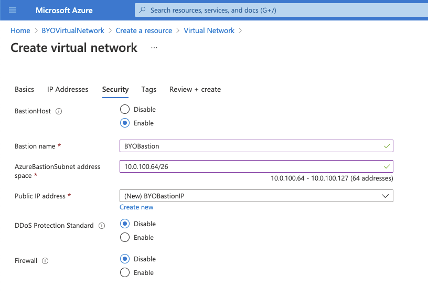
Figure 4. Create a Bastion Host
Network Security Group
The next step is to create a network security group and attach it to the subnet that the workloads will use. The network security group should allow port 443 (TLS for session traffic) from all private IP addresses. Details on Frame networking can be found here.
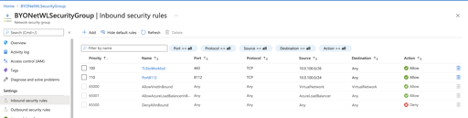
Figure 5. Frame Workload Security Group
1Frame is transitioning to the Frame Guest Agent 8.0. When this transition is completed for a Frame account, inbound traffic on port 8112 will no longer be required.
Once created, the Network Security group can be added to the workload subnet configuration.
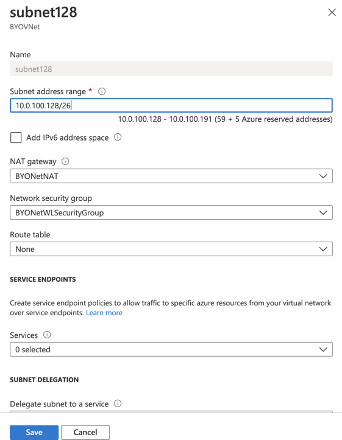
Figure 6. Add network security group to the subnet
Add a RDP Instance
Since I don’t have a private network to connect my Virtual Network to, I will deploy an RDP “jump box” behind the bastion I created so that I can confirm the operation of Frame workloads once they are provisioned in the newly created virtual network.
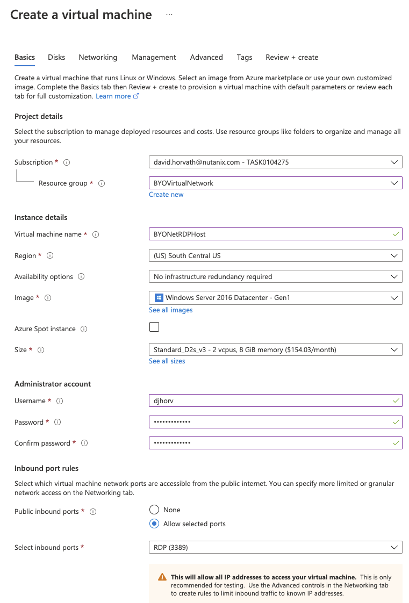
Figure 7. Create Virtual Machine Dialog
Use the defaults on the Disk Tab. On the networking tab, don’t use a public IP and leave the security with the default values. We will fix it later.
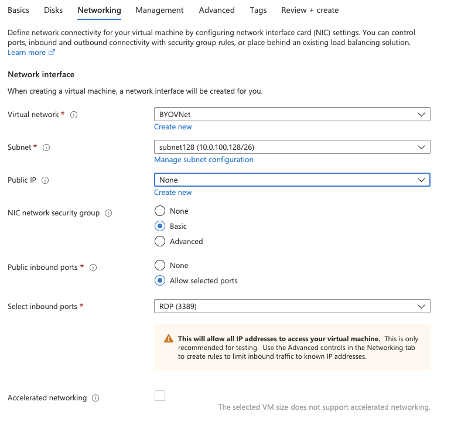
Figure 8. Networking dialog
Once the VM is created, go to the networking tab and change the RDP rule so that it will only allow traffic from the private network.
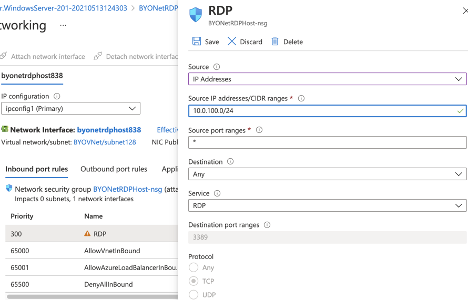
Figure 9. Updated RDP Rule
NAT Gateway
You will need a NAT Gateway to make sure that the Frame Workloads have outbound Internet access. So we will create a NAT Gateway and associate it with the private subnets.
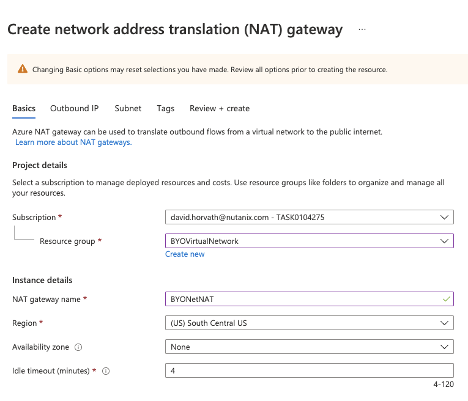
Figure 10. NAT Gateway dialog

Figure 11. New Outbound IP for NAT Gateway
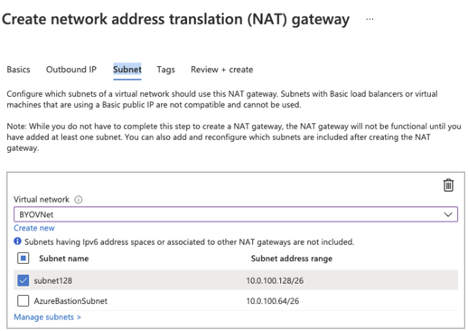
Figure 12. Associated with the Private subnet
Create the New Frame Account
With the Azure private networking setup complete, I now have all the information necessary to set up my Frame BYO Networking account. I have already registered my Azure subscription to my Frame Organization entity (as noted above).
In the “Create Account Dialog,” I choose the correct cloud provider (e.g., Azure) and region (e.g., South Central US) and then select the “BYO Networking” radio button, as seen below.
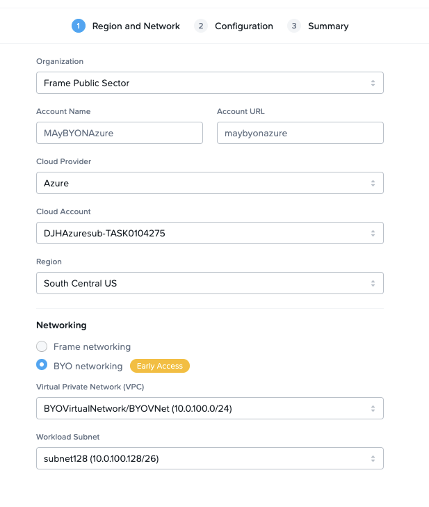
Figure 13. Frame Account Creation
I chose the VirtualNetwork and subnet that I have created and now I can select my sandbox image and instance type and hit Next twice to create my Frame account.
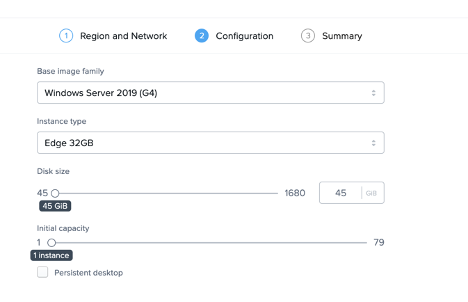
Figure 14. Frame Sandbox Configuration
Congratulations, You’ve Made it Through!
That is it! After a few minutes, my Frame account is created and ready to use. Only machines on the private network can connect to Frame sessions, so RDPing into the Bastion, starting up a browser, and logging into Nutanix Console will be required.
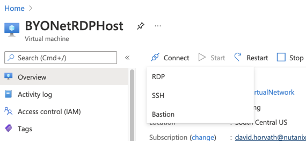
Figure 15. Connect to the RDP host via Bastion
Once you are in the Bastion you can start a session in the sandbox and use the Frame Account as you would normally.
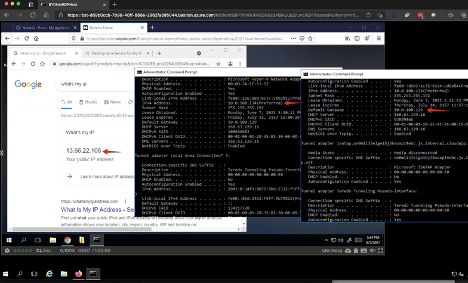
Figure 16. Frame session running on private network
In the above screen shot you can see the RDP host via the bastion has the private IP 10.0.100.132. The Firefox browser on the RDP host has a frame session to a machine on that same private network 10.0.100.134 but a public IP that matches the outbound NAT GW 13.66.22.106.
Conclusion
In this blog we showed how you could set up a Bring Your Own Network Frame account in the Azure platform. The workloads of the Frame account will only have IP addresses on your private network and therefore they inherit all the existing network security controls that would be setup on your private network. For external users, connecting in via RDP is probably not the most efficient way to connect. For those users you can either have them connect via an existing VPN solution or through a Frame Streaming Gateway Appliance (SGA).
David Horvath is a Senior Solutions Architect with Nutanix Frame. He has been a part of the Frame team for almost 4 years and prior to that spent 20 years consulting on various Information Technology projects with the US Intelligence Community.
© 2021 Nutanix, Inc. All rights reserved. Nutanix, the Nutanix logo and all Nutanix products, feature names mentioned herein are registered trademarks or trademarks of Nutanix, Inc. in the United States and other countries. All other brand names mentioned herein are for identification purposes only and may be the trademarks of their respective holder(s). This post may contain links to external websites that are not part of Nutanix.com. Nutanix does not control these sites and disclaims all responsibility for the content or accuracy of any external site.
This post may contain express and implied forward-looking statements, which are not historical facts and are instead based on our current expectations, estimates and beliefs. The accuracy of such statements involves risks and uncertainties and depends upon future events, including those that may be beyond our control, and actual results may differ materially and adversely from those anticipated or implied by such statements. Any forward-looking statements included herein speak only as of the date hereof and, except as required by law, we assume no obligation to update or otherwise revise any of such forward-looking statements to reflect subsequent events or circumstances.