Cloud-based infrastructure has empowered IT managers with the ability to provide their users with virtually unlimited on-demand compute and storage resources from datacenters across the world. Successful capacity management is key to balancing the cost versus user experience equation. Running and pre-provisioned machines make for quick connections for users, but also consume infrastructure costs by keeping the cloud meter running.
As a cloud-based service, Frame has always provided the ability to analyze and manage active capacity usage via the Frame Admin dashboard.
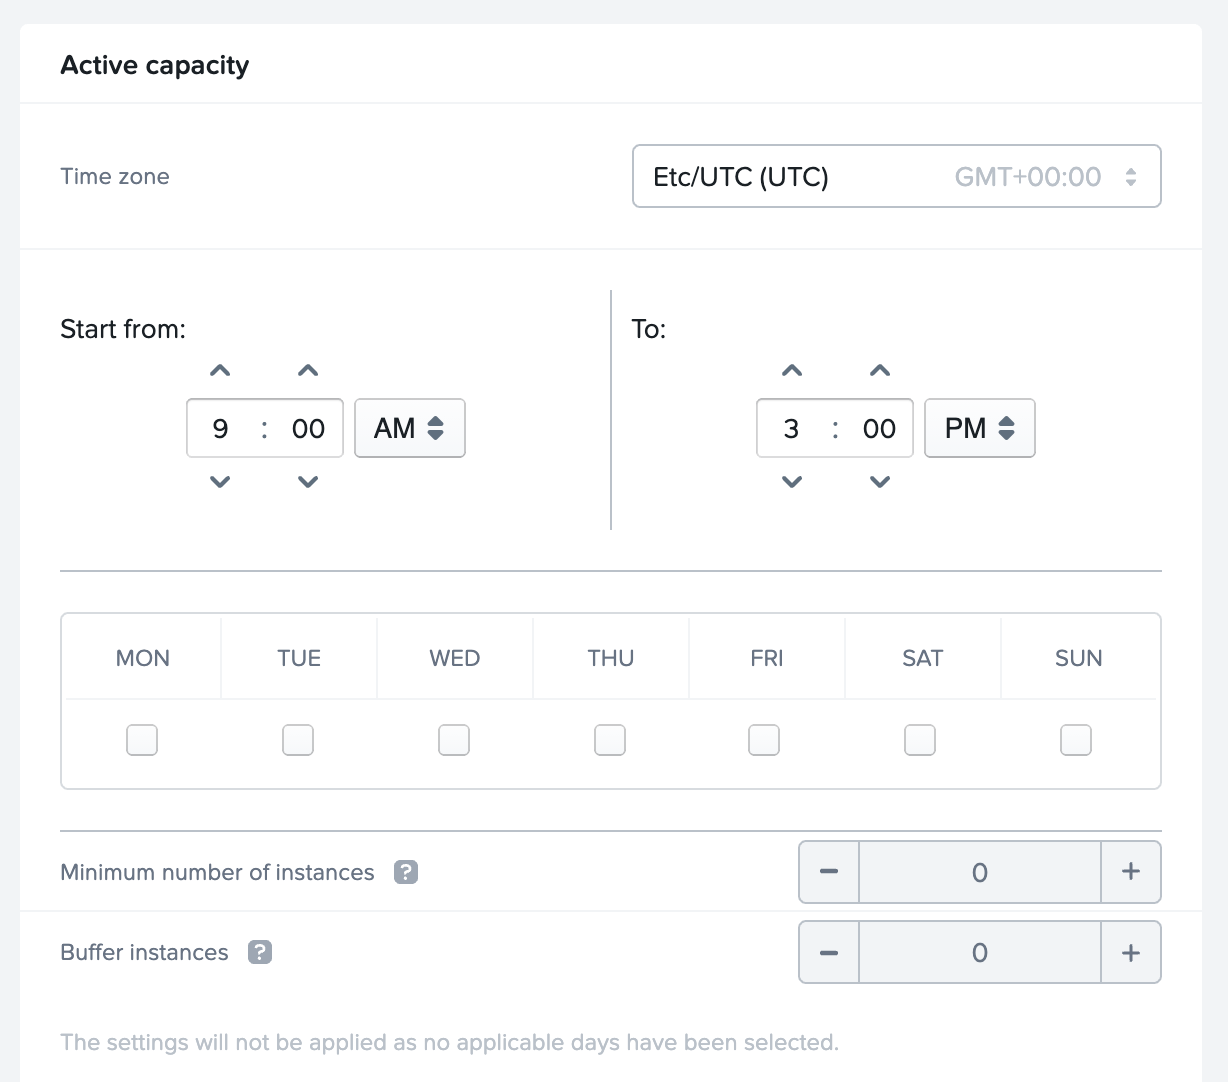
Active capacity configuration
It isn’t surprising that some customers are interested in more dynamic schedules and the ability to schedule the provisioning and deprovisioning of production instances to minimize cloud storage costs. These storage costs are incurred even if machines are not in use. Although the cost may seem low on an individual server basis, having hundreds or thousands of provisioned machines can add up quickly.
Fortunately, the Frame platform also provides a REST-based Admin API that can be used to give the administrator more flexibility in managing their cloud infrastructure storage costs. These API functions in combination with a scheduler (in our example we will use the built-in Windows Server Task Scheduler) gives the Frame administrator maximum flexibility and control over an account’s elasticity settings. This blog shows you how to set up this capability on a Frame utility server in your own Frame account.
Prerequisites
For this tutorial, we will be running the Frame API calls from a Frame utility server. This is not a requirement for the API to work, but it is a simple way to get up on running quickly. If you don’t already have a Frame Windows utility server in one of your Frame accounts, you can deploy one by following our instructions. An Air 4GB instance type should be sufficient for this.
In order to use the Frame Admin API, you will need to gather a few values from your Frame tenant:
Client ID and Client Secret: These are the credentials your script will use to call the Frame Admin API. They can be generated by following these instructions. The role you assign should be “Account Administrator” on the Frame Account that you will be dynamically managing capacity on.
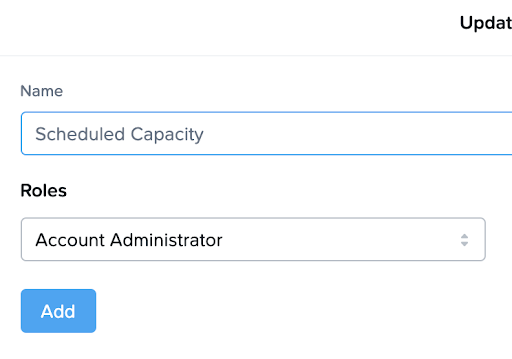
Choose the Account Administrator role.
Account ID: The Account ID is the ID of the Frame Account that you will be updating the elasticity settings. You can find that value by going to the Nutanix Frame Admin UI and choosing “Update” on the account that you plan to change the elasticity parameters on.

Choose “Update” after clicking on the kabob on the far right
In your browser’s Location bar you will see something like:
https://frame.nutanix.com/frame/account/1f86e290-8cd2-4950-9c5a-9d3f7ed332e7/basic-info
The information between “account” and “basic-info” (in this example,1f86e290-8cd2-4950-9c5a-9d3f7ed332e7) is the Account ID.
Pool ID: The last piece of information that you will need is the Pool ID. The easiest way to obtain this value is to call the Frame Admin API. To do this, you will have to execute a PowerShell command on the utility server. To do so, start a session on the utility server and run the following script from the PowerShell prompt. Note: You will have to set the variables to the values you collect above.
#Requires -Version 5


 $clnt_id = "<Client ID>"

 $clnt_secret = "<Client Secret>"

 $acct_id = "<Account ID>"

 $api="https://api-gateway-prod.frame.nutanix.com/v1/accounts/"+$acct_id+"/pools"


 $timestamp = [Math]::Floor([decimal](Get-Date -UFormat "%s"))

 $to_sign = "$($timestamp)$($clnt_id)"

 $hmacsha = New-Object System.Security.Cryptography.HMACSHA256

 $hmacsha.key = [Text.Encoding]::ASCII.GetBytes($clnt_secret)

 $signature = $hmacsha.ComputeHash([Text.Encoding]::ASCII.GetBytes($to_sign))

 $signature = [System.BitConverter]::ToString($signature).Replace('-', '').ToLower()

 $headers = @{

             'X-Frame-ClientId'  = $clnt_id

             'X-Frame-Timestamp' = $timestamp

            'X-Frame-Signature' = $signature

             'Content-Type'      = 'application/json'

 }

 [Net.ServicePointManager]::SecurityProtocol = [Net.SecurityProtocolType]::Tls12

 $response = Invoke-RestMethod -Method Get -Uri $api -Headers $headers

 Write-Output $response
The response should be a list of the production pools associated to that Frame Account where the entries look like:
id            : d2eb96d7-780e-42cb-a4ed-b7bb7ffa64b3

 kind          : production

 name          : Air 8GB

 instance_type : n1-standard-2-Windows

 disk_size     : 50

 external_id   : gateway-prod.370588
You will need to find the production pool that you want to set capacity on (in this case, the Air 8GB) and extract the Pool ID value. This will be the Pool ID that you need in your actual PowerShell script.
Server Setup
Once you have the information you need, you can configure your Frame Utility Server to set the capacity dynamically. On the utility server, create a directory to hold your code (e.g., C:\FrameAPI\). In that directory, place the following PowerShell script. Note: you will need to replace the variables with the information you gathered above.
SetElasticity.ps1
#Requires -Version 5

 <#

   .NOTES

     =======================================================================

      Created on:   10/21/2020

      Organization: Nutanix Frame

      Filename:      SetElasticity.ps1

     =======================================================================

     .DESCRIPTION

     Script to set the max_server setting for a Frame Pool


 Client credentials:

 Client ID, Client Secret, and Account ID

 Pool_ID for the appropriate pool


 #>

 Param

 (

     # the number to set the max servers to.

     [parameter(Mandatory = $true)]

     [int]

     $maxnum

 )

 $clnt_id = "<Client ID>"

 $clnt_secret = "<Client Secret>"

 $acct_id = "<Account ID>"

 $pool_id = "<Pool ID>"


 function Get-FrameAPICall {


     Param

     (

         [parameter(Mandatory = $true)]

         [String]

         $client_id,

         [parameter(Mandatory = $true)]

         [String]

         $client_secret,

         [parameter(Mandatory = $true)]

         [String]

         $api

     )

     try {

         # Create signature

         $timestamp = [Math]::Floor([decimal](Get-Date -UFormat "%s"))

         $to_sign = "$($timestamp)$($client_id)"

         $hmacsha = New-Object System.Security.Cryptography.HMACSHA256

         $hmacsha.key = [Text.Encoding]::ASCII.GetBytes($client_secret)

         $signature = $hmacsha.ComputeHash([Text.Encoding]::ASCII.GetBytes($to_sign))

         $signature = [System.BitConverter]::ToString($signature).Replace('-', '').ToLower()

         # Set HTTP request headers

         $headers = @{

             'X-Frame-ClientId'  = $client_id

             'X-Frame-Timestamp' = $timestamp

             'X-Frame-Signature' = $signature

             'Content-Type'      = 'application/json'

         }

         # Set TLS1.2 (PS uses 1.0 by default) and make HTTP request

         [Net.ServicePointManager]::SecurityProtocol = [Net.SecurityProtocolType]::Tls12

         $response = Invoke-RestMethod -Method Get -Uri $api -Headers $headers

     }

     catch {

         # HTTP 401

         if ($_.Exception.Response.StatusCode -eq "Unauthorized") {

             Write-Error "Check your ClientId and ClientSecret - Unauthorized"

         }

         # HTTP 404

         elseif ($_.Exception.Response.StatusCode -eq "NotFound") {

             Write-Error "Check your ClientID - Not Found"

         }

         # HTTP 403

         elseif ($_.Exception.Response.StatusCode -eq "BadRequest") {

             Write-Error "Check your AccountId - BadRequest"

         }

         # Unhandled exception

         else {

             Write-Error "Unknown error: $($_). For more info contact Nutanix Support"

         }

     }

     return $response


 }

 function Post-FrameAPICall {


     Param

     (

         [parameter(Mandatory = $true)]

         [String]

         $client_id,

         [parameter(Mandatory = $true)]

         [String]

         $client_secret,

         [parameter(Mandatory = $true)]

         [PSCustomObject]

         $post_data,

         [parameter(Mandatory = $true)]

         [String]

         $api

     )


     try {

         $post_data = $post_data | ConvertTo-Json


         # Create signature

         $timestamp = [Math]::Floor([decimal](Get-Date -UFormat "%s"))

         $to_sign = "$($timestamp)$($client_id)"

         $hmacsha = New-Object System.Security.Cryptography.HMACSHA256

         $hmacsha.key = [Text.Encoding]::ASCII.GetBytes($client_secret)

         $signature = $hmacsha.ComputeHash([Text.Encoding]::ASCII.GetBytes($to_sign))

         $signature = [System.BitConverter]::ToString($signature).Replace('-', '').ToLower()

         # Set HTTP request headers

         $headers = @{

             'X-Frame-ClientId'  = $client_id

             'X-Frame-Timestamp' = $timestamp

             'X-Frame-Signature' = $signature

             'Content-Type'      = 'application/json'

         }


         # Set TLS1.2 (PS uses 1.0 by default) and make HTTP request

         [Net.ServicePointManager]::SecurityProtocol = [Net.SecurityProtocolType]::Tls12

         $post_response = Invoke-RestMethod -Method Post -Uri $api -Headers $headers -Body $post_data

     }


     catch {

         # HTTP 401

         if ($_.Exception.Response.StatusCode -eq "Unauthorized") {

             Write-Error "Check your ClientId and ClientSecret - Unauthorized"

         }


         # HTTP 404

         elseif ($_.Exception.Response.StatusCode -eq "NotFound") {

             Write-Error "Check your ClientID - Not Found"

         }

         # HTTP 403

         elseif ($_.Exception.Response.StatusCode -eq "BadRequest") {

             Write-Error "Check your AccountId - BadRequest"

         }


         # Unhandled exception

         else {

             Write-Error "Unknown error: $($_). For more info contact Nutanix Support"

         }

     }

     return $post_response

 }


 # Get Elasticity Settings

 $req_string = "https://api-gateway-prod.frame.nutanix.com/v1/pools/" + $pool_id + "/elasticity_settings"


 $res = Get-FrameAPICall -client_id $clnt_id -client_secret $clnt_secret -api $req_string


 if ($res.max_servers -ne $maxnum) {

     $currentMax = $res.max_servers

     Write-Output "The Number is $currentMax and it should be $maxnum"

     $res.max_servers = $maxnum

     $res1 = Post-FrameAPICall -client_id $clnt_id -client_secret $clnt_secret -post_data $res -api $req_string

     if ($res1 -ne $null)

         {

             Write-Output "Task created with id: " $res1.id

             While ($res1.stage -ne "done")

             {

                 Write-Output "Waiting 30 seconds"

                 Start-Sleep -Seconds 30

                 $req_string = "https://api-gateway-prod.frame.nutanix.com/v1/accounts/" + $acct_id + "/task/" + $res1.id

                 $res1 = Get-FrameAPICall -client_id $clnt_id -client_secret $clnt_secret -api $req_string

             }

             Write-Output "Duration: " $res1.duration_sec

         }

 }

 else {


     Write-Output "Nothing to do."

 }
This script is set to change “max_servers” to the value passed as an argument to the script. The script can be run interactively via the PowerShell shell to confirm the script works properly.
It is easier to run cmd files via task scheduler, so create two files in that same directory (e.g., C:\FrameAPI). These scripts will send their output to a log file by default, so if you create a C:\FrameAPI\Log directory you can collect the logs from those commands.
SetHigh.cmd
powershell -noprofile -executionpolicy bypass -file C:\FrameAPI\SetElasticity.ps1 5 > %date:~7,2%-%date:~4,2%-%date:~10,4%_%time:~0,2%_%time:~3,2%_%time:~6,2%.log
SetLow.cmd
powershell -noprofile -executionpolicy bypass -file C:\FrameAPI\SetElasticity.ps1 0 > %date:~7,2%-%date:~4,2%-%date:~10,4%_%time:~0,2%_%time:~3,2%_%time:~6,2%.log
For this example, the SetHigh.cmd file will set the selected pool’s max capacity to 5 and SetLow.cmd will set the selected pool’s max capacity to zero. The ‘>’ redirects the output to a log file that will be named with the current date and time. You can check these files periodically to confirm the proper execution of the cmd.
You can also run the cmd files interactively to confirm their operation. Finally, you are not limited to just the two command files, you can create as many command files as you need to adjust the settings on your pool to the correct values.
Scheduling
Now that the pieces are in place, all that is left for you to do is to set up the schedule for when your scripts run. To keep things separate, create a local Windows admin user called “FrameAPI” and make it a local administrator. Now open up “Task Scheduler” and choose “Create Task”.
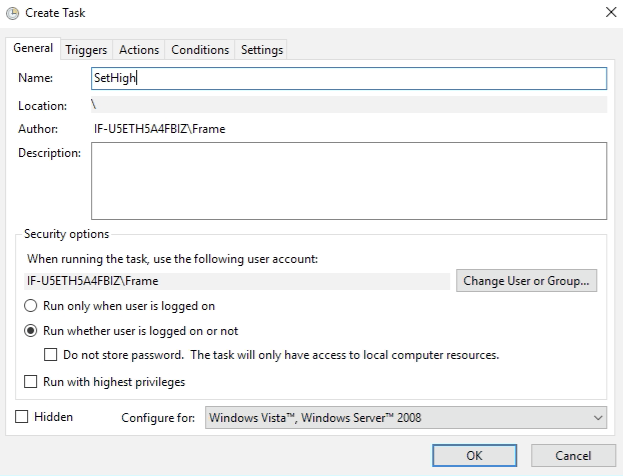
Create Task Dialog
Give your task a name and then “Change User or Group” to have the task use the Windows user you created and choose “Run whether user is logged in or not”.
On the “Triggers” Tab, create a New Trigger. This will allow you to schedule when you want your script to run.
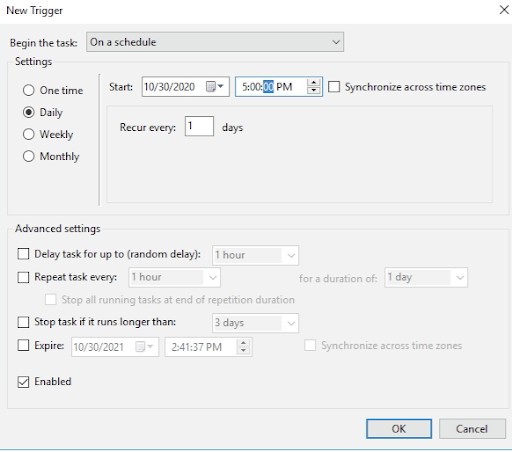
Create Trigger Dialog
Set the schedule, then click on “OK”. Now bring up the “Actions” tab and create a new Action.
Browse to the cmd file and “Start” it in the log directory you created.
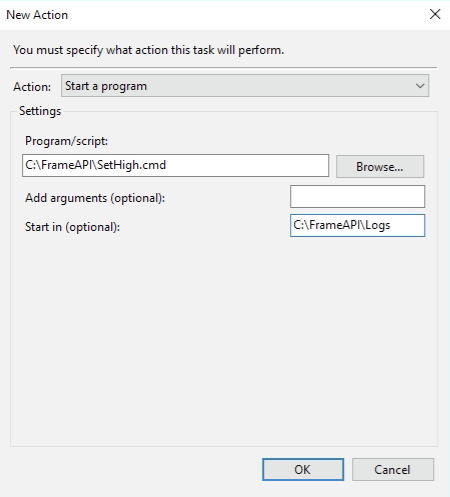
Create Action Dialog
Click on “OK”. You can look on the Conditions and Settings tabs for other options that you might be interested in, but the defaults should work.
Press “OK” and you should be prompted to enter the credentials for the “FrameAPI” user. Enter those credentials and if accepted, the task will now show up in the Task Scheduler Library.
You can now follow the above process and add another task to reset the max number of servers via the “SetLow.cmd”.
You can check back in the Task Scheduler to see if your commands run successfully or check the log files created to confirm task completion. You can also monitor the results on your
‘Frame Analytics - Elasticity’ chart (documented here: https://docs.frame.nutanix.com/capacity-management/analytics.html?highlight=analytics / https://docs.frame.nutanix.com/capacity-management/analytics.html?highlight=analytics#elasticity )
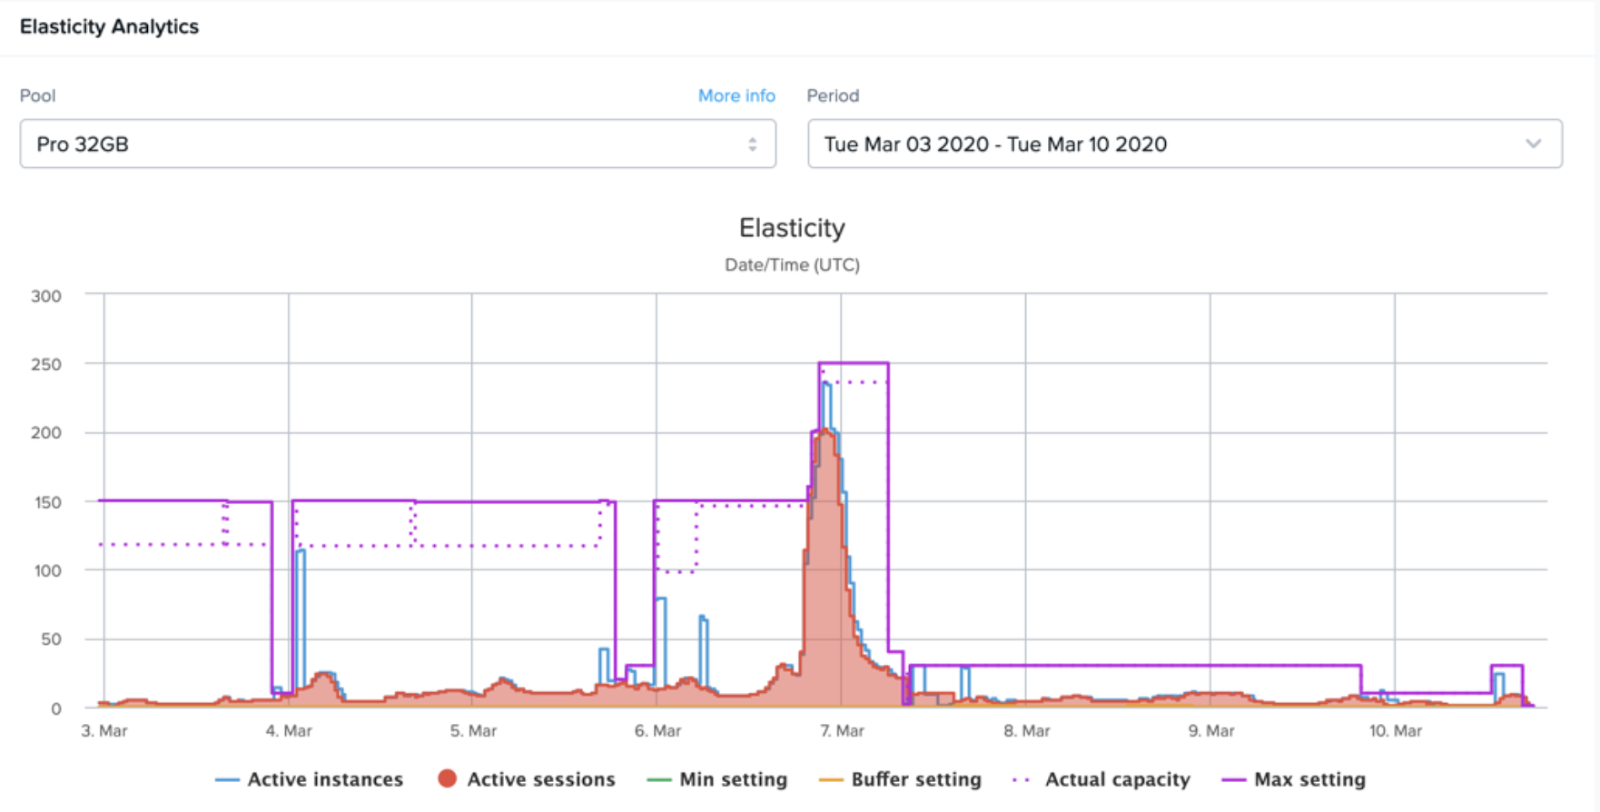
Elasticity Chart showing the “Max Setting” being adjusted
That is it! You have now learned how to use Frame Admin API to increase and decrease the max number of provisioned servers in a production pool to save storage costs. The other capacity settings (min servers and buffer servers) are also a part of the same API call and can be adjusted by relatively simple modifications to the API calls to the main script.
David Horvath is a Senior Solutions Architect with Nutanix Frame. He has been a part of the Frame team for almost 4 years and prior to that spent 20 years consulting on various Information Technology projects with the US Intelligence Community.