Building a Frame Web Application: Making your first API call
By Aleksandar Micovic and William Wong
There are contexts in which managing your Frame account by hand isn’t enough. Sometimes you need a deeper integration to seamlessly manage all of your services. That’s where Frame APIs come in.
In this two-part blog series we will introduce you to the Frame API, both what it is and how to use it. Some programming knowledge is helpful, but not strictly required. The only requirement is knowing your way around a computer.
For the purposes of this blog series, you're going to be playing the part of a budding software engineer for Mark's Hardware, a large fictional retail chain that sells, well, hardware. Imagine this is your first job, and that you aren’t really sure of what you’re doing. Thankfully, you have this blog series to guide you!
Mark, the owner of Mark's Hardware, has tasked you with deeply integrating Nutanix Frame into the company’s intranet, which everyone uses. He wants you to add Frame as an application on the company’s intranet. And to start with, he wants to begin with the customer service teams. The customer service teams only use one application, a tool that helps them manage customer requests, returns, and inventory in general.
Even though it’s just one application, it must be heavily tested on a separate Frame account before it's rolled out to all regional Frame accounts. This is how Mark’s Hardware handles user acceptance testing (UAT). However, because there are so many Frame accounts, it can take a while to manually clone out an approved image to the rest of the accounts across regions.
He's asking two things of you:
- He wants you to find a way to reduce the work of manually cloning accounts once the QA team gives the green light to deploy the application. As new stores open up, he wants the QA-tested image automatically cloned to regional Frame accounts too.
- Once the image has been cloned, he wants you to publish this image with a single click, instead of going into each account and clicking publish.
Before you get started on this project for Mark’s Hardware, please make sure you have some familiarity with Frame and a Frame account. If you don’t have a Frame account, you can start a free trial by following the instructions here. If you're not familiar with Frame, don't worry, there are plenty of screenshots included to help guide you through everything. Because you’ll be building a web application, you’ll also learn a bit about how to do that too.
At the end of this two-part blog series, you will have built a completely functional web application that is actually useful!
Overview of the Nutanix Frame API
Let's start with the basics. What does "API" stand for? API is an acronym for Application Programming Interface. At a high level, an API allows someone to interact with an online service. That's all an API actually is. Using these interactions, it is possible to build a custom experience to satisfy a set of business requirements, or whatever else you might need. Often, developers use it for automating workflows.
Every interaction is called an "API call" or "API request". This is because you're calling the service, requesting that some action take place. The API responds to requests with the information requested, or tells you if there was a problem with the request. So, where does Frame fit into this picture? It's helpful to think of yourself as a human API. For example, when you turn your sandbox on for your Frame account, what you're actually doing is sending a request to Frame to turn on the sandbox. Frame responds by turning the sandbox on. However, there is also an API call that does the same thing. This time, instead of a human hand sending the request through a click on an interface, it’s a computer.
There are many different kinds of API calls. For example, there is also an API call for turning off a sandbox. Frame provides you with many different kinds of API calls that allow you to automate, and build a solution that fits your needs.
At a high level, Frame provides two different kinds of APIs:
- Administration APIs,for managing your Frame account. Example actions include turning your sandbox on and off, or publishing.
- Session APIs, for serving Frame sessions to users. Using this API is out of scope for this series of articles.
Setting up your API credentials
Like any online service, you first need to authenticate to the service to use its API. But to do that, you first need to create a set of credentials. You’ll be creating this set of credentials on the organization level of your Frame account.
Side note: For those of you with some Frame experience, yes, you can also create credentials on the customer-level, or even on the account-level. However, it’s always good to create credentials that minimize the impact of a security breach in case your credentials leak. It’s much better to have your Frame organization compromised rather than your entire Frame customer entity. As for why you don’t do this on the account-level, you’ll be using API calls that read and access multiple accounts. If you tie your credentials to a single account, your scope will also be limited to that account, and you won’t be able to see anything outside of it. You would have to create and manage one credential for each account, and that can be time-consuming.
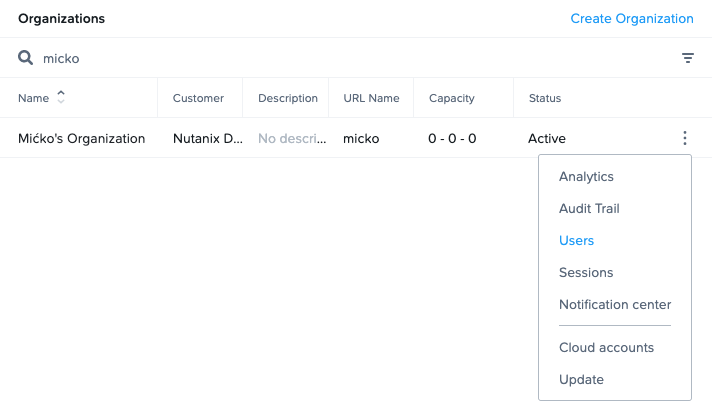
Let’s begin. Open up the Users section of your organization.
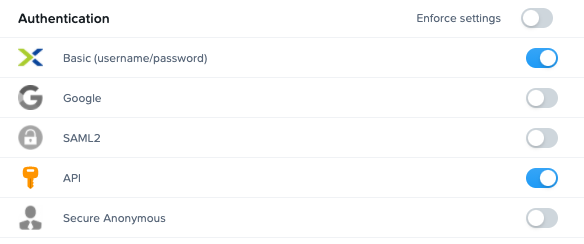
Toggle API, and then click save in the top right:
Once you do this, another tab above will appear. Click on this tab:

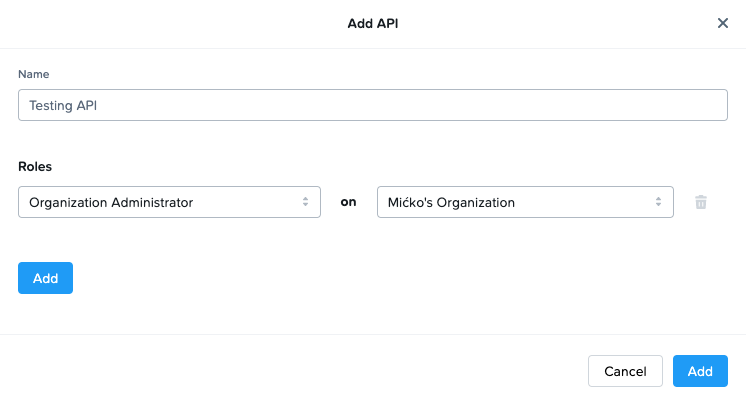
Click the Add API button. Give it any name that you like, but set the role to Organization Administrator, and click the Add button on the bottom right. This role ensures that you have access to all accounts under the organization.
Once that's done, click on the vertical three dots next to the API authorization you just created.
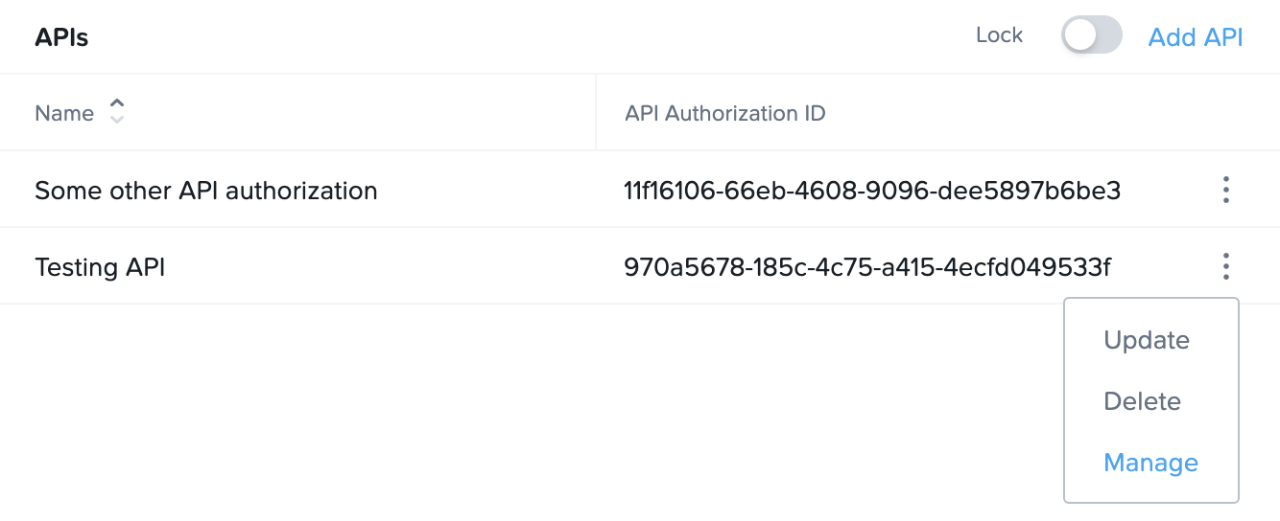
Then, click Manage from the dropdown. Give it any name that you like. Click on the plus sign once done:

You'll get a dialogue box with your API credentials. Copy them and store them in a safe place. These credentials provide blanket access to your entire organization, so don't leave them on a post-it note on your desk. It's also worth noting that for security reasons, this is the only time these credentials are shown. Once you have them copied, you won't be able to get Frame to show you these same credentials again. So, if you lose your credentials, you'll need to recreate them in the same way, by clicking on the plus sign again.
Now that we have our API credentials, we're ready to set up a development environment.
Setting up your environment
You'll be using the Python programming language to use Frame's API. Some operating systems, such as Windows, do not have a Python installation. Follow the instructions here for downloading and installing Python on your own operating system.
Side note: You’ll be using Python 3. If you know your system already has Python, there is a nontrivial chance that you have Python 2 installed. This tutorial follows Python 3 standards and libraries, so you will need to update Python 2 to Python 3.
Open your terminal or command prompt and create a new folder in your home directory. This folder will hold the project code. After you’ve created it, change your working directory to it. The following two commands work on MacOS, Linux, and Windows:
mkdir frame-api-playground
cd frame-api-playground
Once you’re in your project folder, let’s set up a Python virtual environment. This will help keep all packages cleanly contained within the project. Installing anything in this virtual environment will contain it to this project folder, without touching your system files. In fact, even the Python interpreter is instanced to just this folder.
Let’s create our virtual environment.
On MacOS and Linux, the following commands should do the trick:
python3 -m venv env
And on Windows:
py -m venv env
This will create a new "env" folder inside your project folder. Now that our virtual environment is installed, let's go ahead and activate it.
On MacOS and Linux, this is how to turn on this virtual environment:
source env/bin/activate
And on Windows:
.\env\Scripts\activate
You can leave the virtual environment at any time by typing deactivate in your terminal or by closing your terminal. But let's not do that just yet; there's still work to be done! Let's install some packages:
pip3 install requests flask
The requests package will help us make requests to the internet, and the Flask package is for creating web applications. There are other web application frameworks that you can use, but Flask is highly flexible, simple, and easy to use.
Creating a test page
Now let's see if everything is functioning correctly. Create a file called "main.py" in the root of the project folder (frame-api-playground), and in it, add the following code:
from flask import Flask

 app = Flask(__name__)

 @app.route('/')

 def main():

      return "Hello, world!"
Once this is done, you need to tell our operating system where our application is.
On MacOS and Linux, this is done by the following command:
export FLASK_APP=main.py
On Windows with just the command prompt:
set FLASK_APP=main.py
And on Windows with PowerShell:
$env:FLASK_APP = "main.py"
Once this is done, let's test to see if everything is working:
flask run
You should see an output that includes a local URL. By default, this URL should be http://127.0.0.1:5000/. Copy it and open it in a browser. If the URL is something else, that's fine too, just open it up in the browser.
You should see "Hello, world!" as the only thing on the page. If you're seeing this, it means that you have correctly configured our environment. Now, let's move onto using the Frame Administration API for the first time!
Using the Frame Administration API for the first time
Flask has a local web server included, so you can now create a simple web application that will talk to Frame Platform using the Frame Admin API.
To use the API, you must first authenticate with our credentials. These were the values you copied in a (hopefully) secure location earlier. Let's add a helper function to the web application you're building that will authenticate us. Copy and paste the following code, replacing the contents of main.py, and then we'll go through it line by line:
from flask import Flask, request, render_template, redirect, url_for
import hashlib
import hmac
import time
import requests
import base64

CLIENT_ID = "<Your API Client ID goes here>"
CLIENT_SECRET = b"<Your API Client Secret goes here>"

app = Flask(__name__)

def authenticate():
    # Create signature

    timestamp = int(time.time())
    to_sign = "%s%s" % (timestamp, CLIENT_ID)
    signature = hmac.new(CLIENT_SECRET, to_sign.encode('utf-8'), hashlib.sha256).hexdigest()

    # Prepare http request headers

    headers = { "X-Frame-ClientId": CLIENT_ID, "X-Frame-Timestamp": str(timestamp), "X-Frame-Signature": signature }

    return headers

@app.route('/')
def main():
    headers = authenticate()
- At the top we're importing additional utilities to help us create a proper request to Frame.
- The next two lines are our client ID and client secret. Be sure to replace these values with the ones that we've copied.
- The authenticate function uses the imported utilities to create a proper signature that our script will use to send a request to Frame.
Now, let's focus on the "main" function, and make our first Frame API call.
Since you're using an existing Frame account, you probably already have some accounts under your organization. If not, go ahead and create one right now. It should only take a couple of minutes. This is necessary, because the first API call you'll be making is actually a call to grab all of the accounts on our organization.
We’ll be adding to our main function. Once you have some accounts, make sure your main function looks like this:
@app.route('/')
def main():
    headers = authenticate()
    r = requests.get("https://api-gateway-prod.frame.nutanix.com/v1/accounts", headers=headers)
    accounts = []

    for account in r.json():
        accounts.append(account['name'])

    return ", ".join(accounts)
Using the requests library, you call the Frame API endpoint "accounts" which returns a list of accounts to us. This is denoted by the "v1/accounts". v1 denotes the version of the API call. You make this API call by passing in a headers object that you created earlier. Once you get a list of accounts, you go through the list, and return them to Flask to display on the page. Go ahead and run Flask, and see the results for yourself:
flask run
Congratulations! You've just made your first Frame API call. In the next blog post, you'll start fulfilling your fictional boss' request, and find a way to clone an image from a test account to many accounts at the same time. And once you do that, the third and final post of the series will cover how to launch Frame user sessions.
This blog is provided for informational purposes only. For more detailed technical specifications and knowledge base articles about the Nutanix technology please create a my.nutanix account which will provide you with a wealth of documentation to support your Nutanix discovery.
© 2021 Nutanix, Inc. All rights reserved. Nutanix, the Nutanix logo and all Nutanix product and service names mentioned herein are registered trademarks or trademarks of Nutanix, Inc. in the United States and other countries. Other brand names mentioned herein are for identification purposes only and may be the trademarks of their respective holder(s). This post may contain links to external websites that are not part of Nutanix.com. Nutanix does not control these sites and disclaims all responsibility for the content or accuracy of any external site. This post may contain express and implied forward-looking statements, which are not historical facts and are instead based on our current expectations, estimates and beliefs. The accuracy of such statements involves risks and uncertainties and depends upon future events, including those that may be beyond our control, and actual results may differ materially and adversely from those anticipated or implied by such statements. Any forward-looking statements included herein speak only as of the date hereof and, except as required by law, we assume no obligation to update or otherwise revise any of such forward-looking statements to reflect subsequent events or circumstances.