Deploy 600 Citrix Desktops on Nutanix in 1 Hour
In today’s digital economy, enterprises are reassessing their end-user computing (EUC) strategies and seeking solutions to enable employees to work from anywhere with secure remote access to applications, desktops, and data.
Nutanix and Citrix have teamed together to provide a robust platform for Citrix Virtual Apps and Desktops. The joint solution delivers a number of immediate operational benefits. Based on real-world experience, customers achieve up to:
- 8x faster time to deploy
- 60% reduction in infrastructure costs
- 97% reduction in downtime experienced by end-users
Getting new virtual desktops up and running quickly is more critical than ever. This blog explains how Nutanix and Citrix technology can enable you to deploy 600 new Citrix desktops to an existing Citrix site in about an hour on new hardware. If you need to expand your existing Citrix environment quickly, Nutanix FastTrack for VDI may be of interest.
When expanding a Citrix site, there are two options:
- Add hardware to an existing cluster and expand the existing desktop pool
- Create a new Nutanix cluster and add it to the existing Citrix site
This blog (and the associated video) demonstrates option 2 to show the speed of cluster creation and the ease of Nutanix integrated replication. It’s a simple task completed in three steps:
- Step 1. Install a Nutanix cluster
- Step 2. Configure the new cluster to support Citrix
- Step 3. Configure Citrix to run on the new cluster
Below are details for each step including estimates of the active time (the time needed for an experienced admin to complete the hands on part of the task) and total time (the total time needed for completion, including automated background tasks). The total active time adds up to around 15 minutes.
This 6-minute video shows the process in detail.
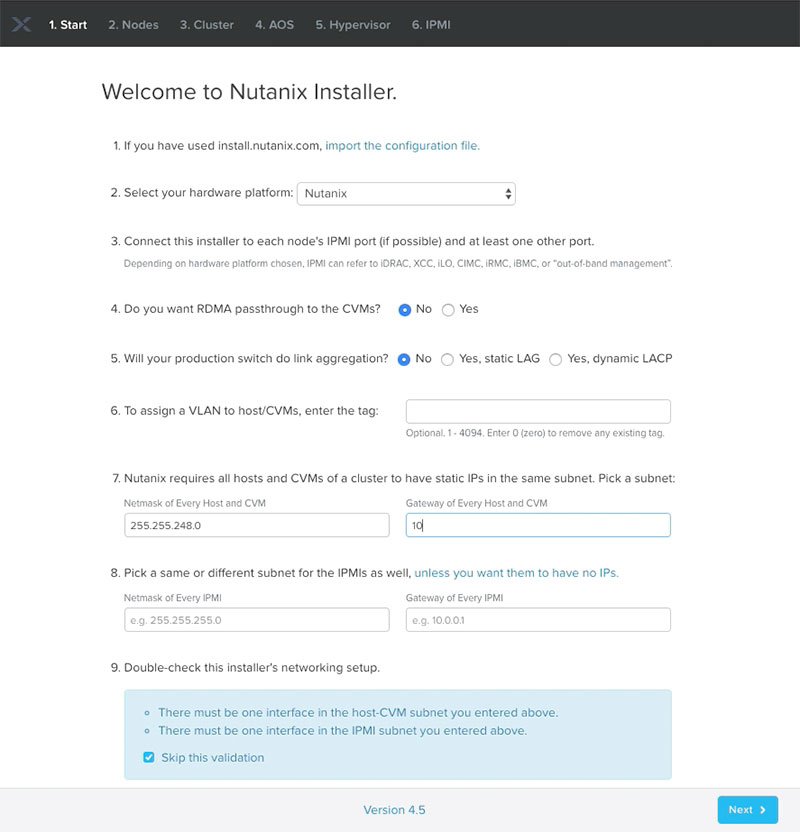
Step 1: Install a Nutanix Cluster
Active time: Less than 5 minutes
Total time: 38 minutes (including installation of software, including AHV, on all nodes)
With most infrastructure solutions, installing the necessary software on new hardware nodes is a time-consuming—and potentially error-prone—process. With Nutanix Foundation, once the hardware is racked and stacked, the installation is simple, highly automated, and fast. The Nutanix Installer guides you through a series of simple dialogs to assign necessary IP addresses, configure new nodes, define cluster resiliency and other parameters, choose the desired software and hypervisor versions, and provide Intelligent Platform Management Interface (IPMI) credentials. Nutanix provides default settings for IPMI and other settings wherever that simplify the process further.
An administrator familiar with Nutanix can typically complete the preliminaries in less than 5 minutes and start the installation. Once started, the entire software install process—including hypervisor installation—takes about 35 minutes to complete.
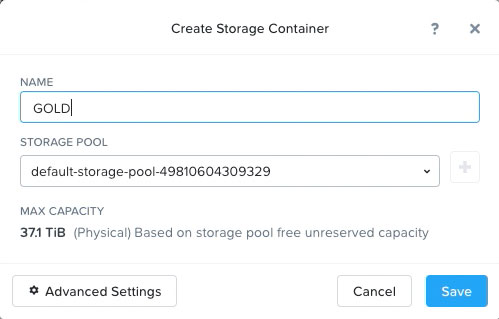
Step 2: Prepare the New Cluster for Citrix
Active time: Less than 6 minutes.
Total time: 15 minutes (including replication of golden image)
Once the cluster has finished installing, there are a few steps that have to be performed to get it ready for use by Citrix:
- Create a storage container
- Add a network for new desktops
- Replicate the golden image
These steps can all be accomplished quickly using Nutanix Prism, which simplifies and streamlines common workflows to make hypervisor and VM management a snap. In a traditional infrastructure environment, you might need at least three separate tools—and significant time and expertise—to accomplish these same tasks, and three separate teams might need to get involved.
The most time-consuming part of the process is setting up an hourly replication to keep the golden image in sync between an existing cluster and the new cluster. This ensures that all desktops run the same image.
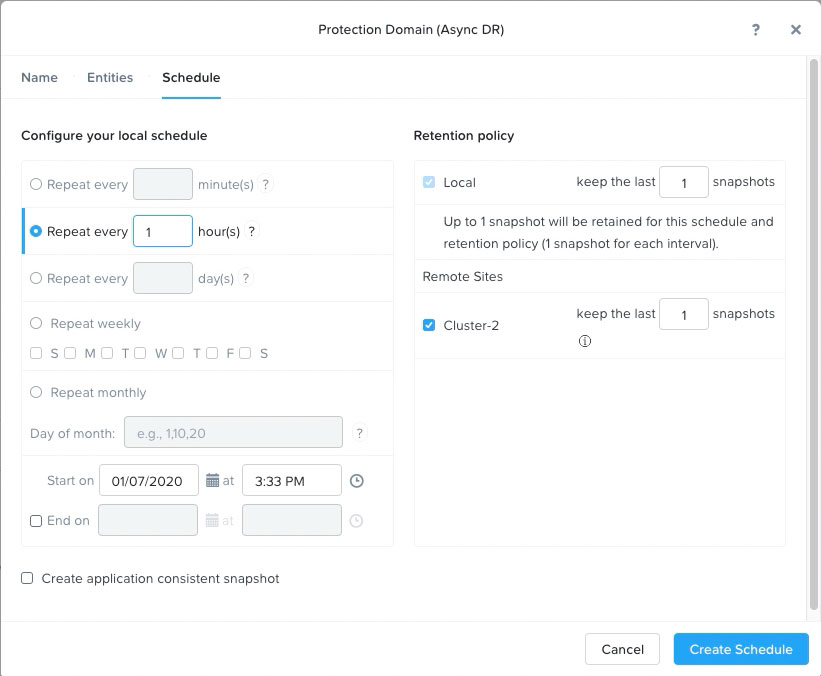
Once again, these procedures can be accomplished very efficiently, taking less than 6 minutes for the initial replication to commence. To achieve maximum efficiency, while you are waiting for the golden image to replicate you can begin adding the hosting connection in Citrix Studio. (See Step 3.)
Once replication has completed, just two Nutanix steps remain:
- Create a virtual machine based on the replicated snapshot of the golden image
- Create a new snapshot of the running virtual machine
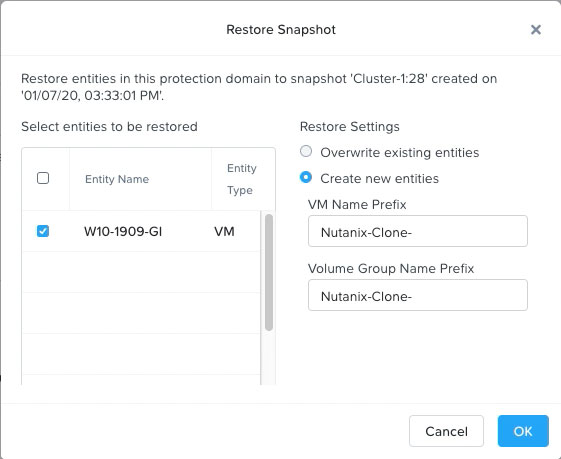
The resulting snapshot is used during Citrix configuration.
Step 3. Configure Citrix for the New Cluster
Active time: About 5 minutes.
Total time: 12 minutes (including time to create 600 VMs)
Once the Nutanix steps are completed, Citrix Studio provides step-by-step procedures that make it simple to add the new cluster and complete the Citrix setup. There are three major tasks that have to be performed:
- Add the new cluster to Citrix
- Create a new machine catalog with 600 desktops on the cluster
- Create a new delivery group to go with the machine catalog
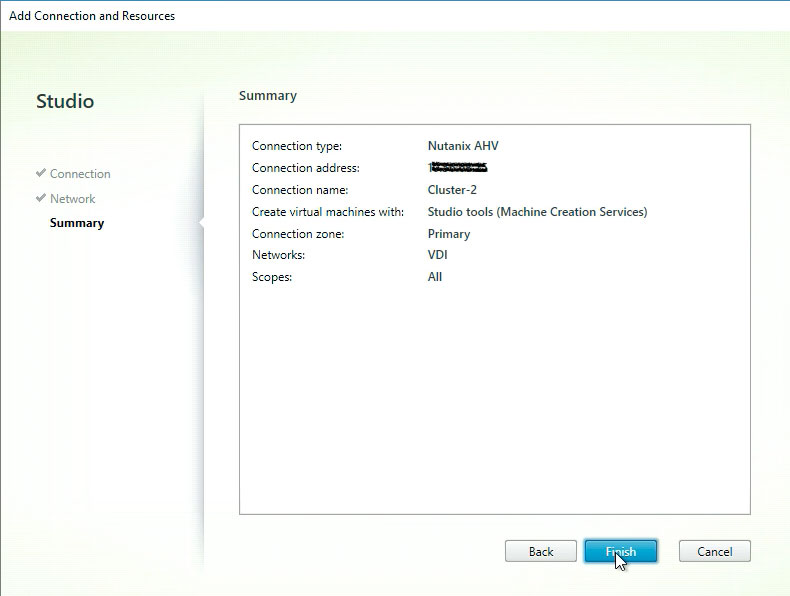
Add the New Cluster to Citrix
Adding the new cluster to Citrix requires a new connection and resources to be defined. This is simply a matter of configuring the connection type (in this case AHV), and supplying credentials, an IP address, and a name. The process takes at most a few minutes.
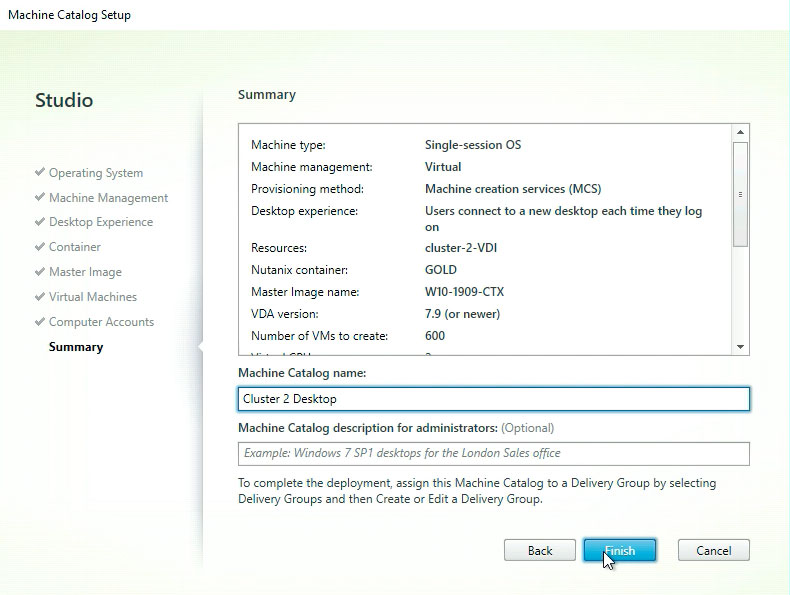
Create a New Machine Catalog
Creating a machine catalog for the new cluster is accomplished using the Citrix “Create Machine Catalog” action which guides you through the necessary configuration steps. There are a few details to be aware of for each step:
- Operating System. Allows you to choose between multi-session, single-session, and remote desktop access. In the example, “Single-session OS” was used, which is appropriate for VDI desktops.
- Machine Management. Allows you to configure the type of machine (in this case virtual machines) and how machines are deployed. This solution uses Citrix Machine Creation Services (MCS), which creates and manages VMs using the capabilities of the underlying hypervisor. Linked clones are used to provision individual virtual desktops.
- Desktop Experience. Controls whether users see a new desktop each time or are able to retain and personalize desktops.
- Container. Defines the container where virtual machine identity disks are stored. Use the storage container configured earlier during Nutanix configuration.
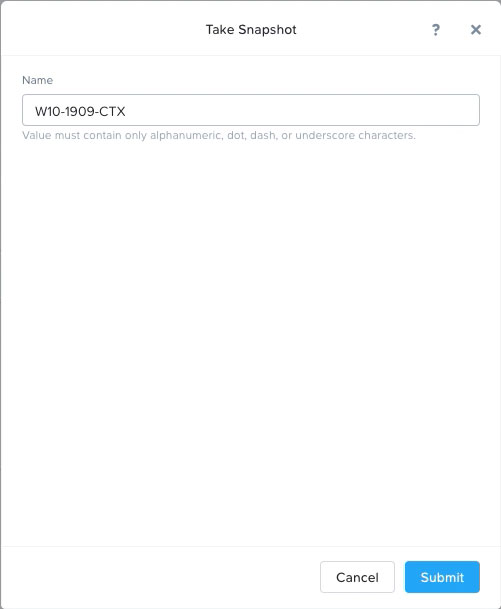
- Master Image. Allows you to choose the master image used to create desktops. The Nutanix snapshot created at the end of Step 2 serves as the master image. As a result, the golden image replicated from the original cluster can be updated without affecting the current master image.
- Virtual Machines. Sets the number of virtual machines to be created on the cluster (600 VMs) and the memory and CPU characteristics for individual VMs.
- Computer Accounts. Defines Active Directory settings for desktop access.
Create a Delivery Group
Once the machine catalog is ready, the final task is to create a delivery group using the Citrix “Create Delivery Group” action. (Alternatively, you can add the new desktops to an existing delivery group if you prefer.) Again, the procedure progresses through all the required steps, including selecting the machine catalog, configuring the number of machines in the delivery group, adding applications (if any), and specifying who can use the desktops.
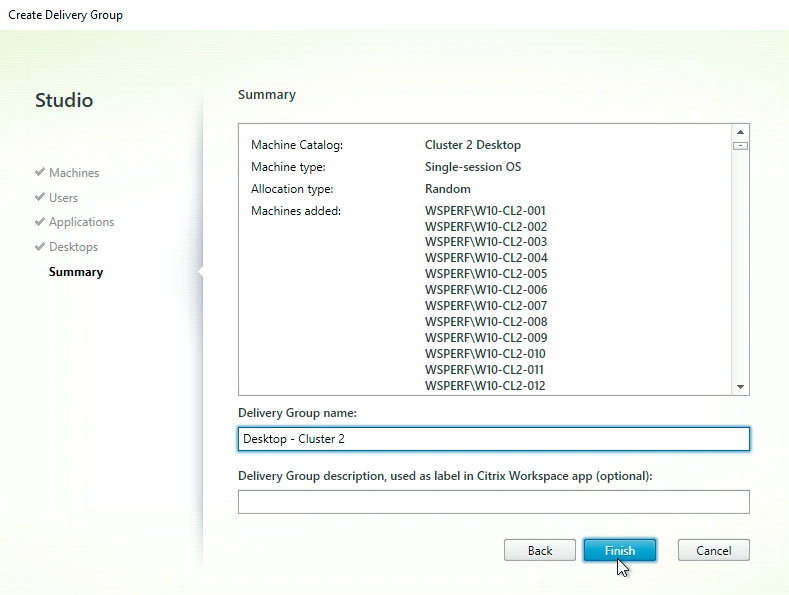
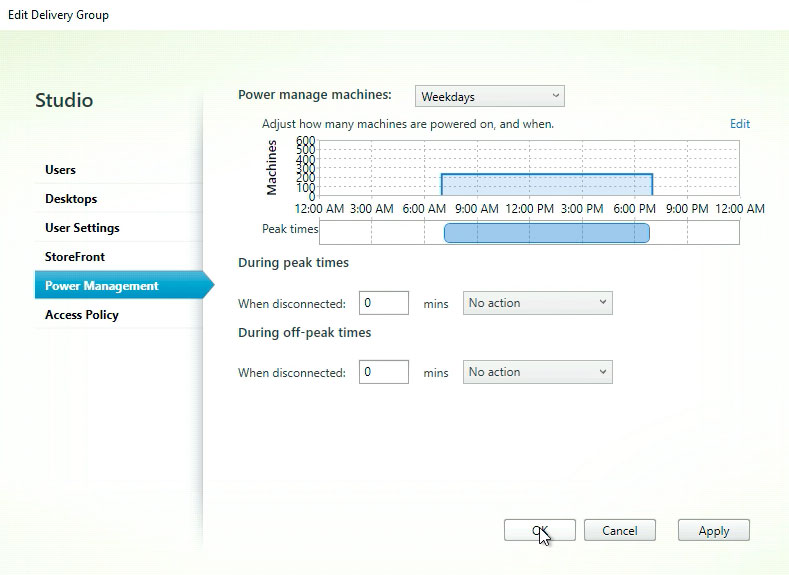
Once the delivery group is created, the virtual desktops on the new cluster become available for use. You can return to the delivery group to adjust power management parameters as needed to ensure that users can log on quickly, without using excessive resources during off-peak hours.
Getting Started with Nutanix and Citrix
Citrix Virtual Apps and Desktops running on Nutanix can enable end-users to work efficiently from home or any location, making them more mobile and more productive, reducing the risk of data and intellectual property loss, and making IT operations more efficient.
If you’ve been putting off a planned VDI project, now’s the time to get started. Nutanix can help you scale your VDI deployment more quickly.
To learn more about running Citrix solutions on Nutanix, visit nutanix.com/citrix, or read the best practices guide: Citrix Virtual Apps and Desktops on Nutanix.